


13 June 2015
Queen Hunting
Round Ten Review of the Final FIDE Grand Prix in Khanty-Mansiysk by GM Vasily Yemelin.
The penultimate round has made our day not only because of its inherent emotional stress, but also because of the opening decisions that came together with it.
An extremely vital victory was scored by Jakovenko, and it is this game that we are going to use as a starting point of our review.
Jakovenko – Karjakin
1.d4 Nf6 2.c4 e6 3.Nf3 d5 4.Nc3 c6 5.e3 Nbd7 6.Qc2 Bd6 7.Bd3 0–0 8.0–0 dxc4 9.Bxc4 a6 10.Rd1 b5 11.Bd3 Qc7 12.Bd2 c5 13.Ne4 c4 14.Nxd6 Qxd6 15.Be2 Bb7 16.b3 Rfc8
Black’s scoring statistics in this line fails to measure up to its evaluation; probably it is to be attributed to the fact that it is much easier to handle this position for the player with a bishop pair advantage. To my mind, a more or less successful way to hold this position together is by sticking to the plan with Bd5, Ne4 and f5. This line has already been employed by Jakovenko against Ragger, who put this idea to execution without further delay: 16...Bd5 17.Qb2 Ne4 18.Ba5 f5 19.Ne1 Rf6 20.bxc4 bxc4 21.Qb4 Qxb4 22.Bxb4 a5 23.Bd2 Rff8 24.f3 Nxd2 25.Rxd2 Rab8 26.Rc1 Rb4 27.a3 Rb3 28.e4 fxe4 29.fxe4 Bxe4 30.Bxc4 Rb6= and the position is very close to being equal, as in Jakovenko-Ragger, Plovdiv 2012.
17.Qb2 Rab8
17...Bd5 is another valid alternative in this position.
18.Rac1 h6
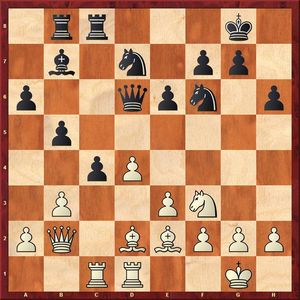
Later Karjakin admitted that the setup that he opted for was a rather combative one. However, it is still to be clarified what was the exact idea behind his last two moves in this well-known position, because White has been given the option of 19.Ne5!, when all the combative spirit of Black’s has evaporated and White is better in a risk-free position. Of course, White needed to foresee the consequences of the subsequent line to make certain that the e5-pawn is not in any sort of danger.
19...cxb3 20.axb3 Rxc1 21.Rxc1 Nxe5 22.dxe5 Qd5 23.f3 Ng4
Black plays an active move out of sheer inertia, but this is a miscalculation. After 23...Nd7 he could have continued to put up fighting both after 24.Bb4 Rc8 25.Rxc8+ Bxc8 26.Qc3 Bb7 27.Bd6 f5 28.Kf2 Qc6, as well as after 24.e4 Qxe5 25.Qxe5 Nxe5 26.Bf4 f6 27.Rc7 a5 28.Be3 a4 29.bxa4 bxa4 30.Ba7 Ra8 31.Rxb7 a3 32.Bd4 a2 33.f4 (33.Ba1 Rc8) 33...a1Q+ 34.Bxa1 Rxa1+ 35.Kf2 Ng6 36.g3 Ra2, and despite the weakness of the e6-pawn, the reduced amount of material contributes into the likely drawish outcome of this position.
24.Bb4! Rd8
24...Nxe3 25.Bd6 Rd8 would have transposed into what happened in the game.
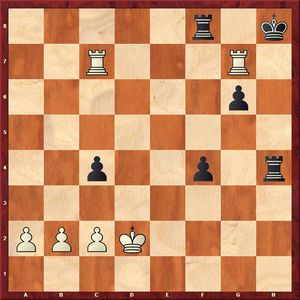
25.Bd6 Nxe3 26.Rc5
This is the point behind the 19.Ne5! idea as the queen has been trapped.
26...Rxd6 27.Rxd5 Rxd5 28.Qc3 Nf5 29.Kf2
It appears that stronger was 29.Qc7 Rd2 30.Qb8+ Kh7 31.Qxb7 Rxe2 32.Qxf7 Rxe5 33.Qd7 xd4 33...Re3 34.b4 h5 35.Kf2 and White is very likely to pull Black’s position apart as rook and knight are not going to cope with White’s queen playing on both flanks of the board. However, one can understand Jakovenko’s train of thoughts as he was apprehensive of premature simplifications and tried to keep as much flexibility in the position as possible. Black's position keeps being difficult, although probably not yet entirely hopeless.
29...Rd7 30.g4 Ne7
30...Nd4 looked quite attractive as well.
31.f4 g6 32.h4 Kg7?! 33.Bd3
White could have attempted to capitalize on the misplaced position of the black king via 33.h5 because 33..gxh5? fails to 34.f5, and if Black refrains from taking on h5 his position is going to deteriorate after subsequent exchanges on g6.

Or course, the black king being lined up against the white queen along the central diagonal makes him prone to the f4-f5 stab, so he should have seized the opportunity to improve the situation via: 33...Kg8. Due to some reasons, unknown to us, Karjakin allows f4-f5 when his position becomes hopeless.
33...Nc6?! 34.Be4 Ne7 35.Bd3 Nc6 36.f5+– b4 37.f6+ Kg8 38.Qc1 Nxe5 39.Be2 Nd3+ 40.Bxd3 Rxd3 41.Ke2 Rf3 42.g5
White could have grabbed another minor piece after 42.Qc7 Rxf6 43.Qxb7, and Black is not in time to set up a fortress: 43…e5 44.Qxb4 Re6 45.g5 hxg5 46.hxg5 Kg7 47.Ke3 Rc6 48.Qa5 Re6 49.Ke4 Kg8 50.Qd8+ Kg7 51.b4+–. Black is in zugzwang and his fortress falls apart. Jakovenko’s path to the victory is slower, but not less reliable at the same time. Once the white pawn has reached f6, Black is out of the game.
42...Rc3
42...hxg5 43.hxg5 would have opened the way for the white queen to h6.
43.Qf4 Rc8 44.Qd6 Be4 45.gxh6 g5
This is forced because otherwise White’s queen is going to find its way to f8 sooner or later with inevitable mate to follow.
46.Qxb4 Bf5 47.hxg5 Kh7 48.Qb7 Rc2+ 49.Kd1 Bg6 50.b4 Rc4 51.Qe7 Bh5+ 52.Ke1 Re4+ 53.Kf2 Rg4 54.Qc5 Rf4+ 55.Kg3
Quite spectacular and noteworthy win could have been achieved by putting a pawn en prise of three black pieces: 55.Ke3 Rf5 56.g6+! Kxg6 57.Qf8.
55...Rf5 56.Qe3 Bg6 57.Kh4 Rd5 58.Qb6 Bf5 59.Kg3 Kg6 60.Qa7 Rd3+ 61.Kf4 Rh3 62.Ke5 Rh4 63.Qe7 Rh5 64.Qf8
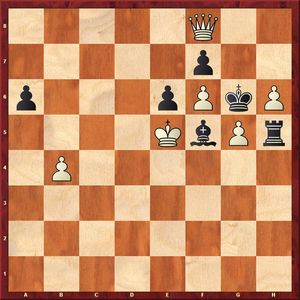
The final position testifies to the triumph of White’s plan. Black played 64…Rxg5 and immediately resigned in view of the following possible line: 65.h7 (also good is 65.Kd6) 65...Kxh7 66.Qxf7+ Kh6 67.Qf8+ Kh5 68.f7.
Caruana – Nakamura
1.d4 c5 2.e4 d6 3.Nf3 cxd4
It is in this particular order that the moves are given on the official website of the tournament. One may have an impression of Caruana being very well prepared in the opening to meet 2…cxd4 with something like the Morra Gambit, but was probably apprehensive of Nakamura’s powerful preparation after 3.dxc5 Qa5…
However, there must have occurred some kind of a mistake during broadcasting. Taking into account that every now and then we are just being ruthlessly mocked by current chess engines in a lot of lines, I am not going to be at all surprised if a regular electronic chess board is going to do the same to us in the nearest future.
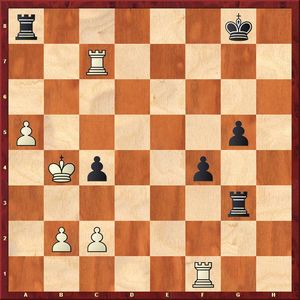
The subsequent game followed one of the very well-known lines of the Dragon variation, where Nakamura opted for a new continuation that petered out to a lot of simplifications. However, the arising (not as a result of the forcing lines, though) four-rook endgame is far from being characterized as a dead draw:

Pawn racing is not a hallmark of the four-rook ending to the same degree as it is of the two-rook ending. The pawns are less frequently seen running up and down the board as the unsheltered kings become more susceptible targets to rook hunting. White’s chances are preferable due to his more active rook on the seventh rank and because it is his turn to move.
Let’s have a look at a rather primitive line first: 31.a4 f5 32.a5 Rf7 33.Rxf7 Kxf7 34.Rf3.
Now after 34...Re4 35.Rc3 Ke6 36.Rxc5 g5 (or 36...f4 37.Kd2 f3 38.Rc8 Ke7 39.Rc3) 37.a6 g4 38.Rc6+ Kd5 39.Rg6 Re1+ 40.Kd2 Ra1 41.Kd3 White manages to stop black pawns and create problems for Black, therefore it is essential that his rook be placed on the proper square:
34…Rg1+ 35.Kd2 Rb1! causing the b-pawn to move from the home square in order to secure the possibility of placing his rook comfortably behind the White’s a-pawn.
A simple draw results after 36.Rb3 c4 37.Rb7+ Kf6 38.a6 Ra1 39.a7 g5 40.Ke3 g4 41.Kf4 Rf1+ 42.Kg3 Rg1+ 43.Kf2 Ra1= (Black is just in time. This is a little miracle, isn’t it?). The game ends in a draw also after 36.a6 Rxb2 37.Ra3 Rb8 38.a7 Ra8 39.Kd3 g5 40.Kc4 g4 41.Kxc5 Ke6 42.Kb6 f4 43.Ra4 Ke5 44.Ra5+ Ke4 45.Rg5 g3 46.Kb7 Rxa7+ 47.Kxa7 Kf3 48.c4 Kf2 49.c5 g2 50.c6 g1Q 51.Rxg1 Kxg1 52.c7 f3 53.c8Q f2=.
31.Rc7
By forcing the black pawn to move, White not only obstructs access to the a4-square, thus preventing the black rook from being placed behind his a-pawn in future, but also urges the pawn in the direction of his king ready to enter the game.
31...c4 32.Kd2
Now 32.a4 looked more cheerful than on the previous move: 32…f5 33.a5 Ra8 34.Rc5 c3!? (34...Kf7 35.Kd2 Rg3 36.Rf4 c3+ 37.bxc3 Ke6 38.Rb4 Kd6 39.Rbb5 would lead to an unclear sharp ending with the ruined pawn structure on the one hand but with an extra pawn for White nonetheless) 35.b3 Kg7 36.Kb1 Kf6.
Moving the king towards the black pawns would have presented a wrong approach: 37.Rf3 Re4 38.Rfxc3 f4 39.Kc1 (White has to take care now in order not to find himself in a lost position as the two pawns of Black are faster the than three pawns of White, for example: 39.Rc6+ Re6 40.b4 g5 41.Kc1? g4 42.Rxe6+ Kxe6 43.Kd1 f3 44.Ke1 Rg8–+) 39...g5 40.Rd5 Ra6 and White needs to bail out using the advantage that the pair of rooks working together can afford him in this position: 41.Rcc5 g4 42.Rh5 Kf7 43.Rh7+ Kg6 44.Rch5 Rxa5 45.R7h6+=.
A more energetic approach would be to try to push your own pawns: 37.Ka2 Re4 38.Ka3 f4 39.b4 g5 40.Rg1! – as a result of too many rooks on the board it may turn out that the progress of the pawns towards the queening square can put one of them at risk of being eliminated. However, in this position the pushing of the pawns forward ends in a draw: 40…f3 41.Rgxg5 Rf4 42.Rg1 f2 43.Rf1 Rg8 44.Rd5 Ke6 45.Rd3 Rg1 46.Rdd1 Rgg4 – now it is Black’s turn to profit from his pair of rooks to do away with White’s passed pawns 47.a6 Rxb4 48.Rxf2 Ra4+ 49.Kb3 Rgb4+ 50.Kxc3 Rc4+ 51.Kd3 Rd4+ 52.Ke2 Rxd1 53.Kxd1 Rxa6=.
32...f5 33.a4
Instead of this move, which results in a quick draw, White had at his disposal some interesting possibilities to maintain the fight: 33.Re1 f4 34.Ree7 Rh4 35.Rg7+ Kh8
It seems that the black f-pawn is only one step away from queening while white pawns have not even started from their home squares yet, but in fact everything is under control as White can interfere at the right moment by placing his rook on f7: 36.a4!? (although the pawn can be captured, the game still ends in a draw as follows: 36.Rxg6 Rh2+ 37.Kc3 Rh3+ 38.Kb4 f3 39.Rg1 f2 40.Rf1 Re3 41.Rxc4 Re1 42.Rh4+ Kg7 43.Rhh1 Rb8+ and White must either put up with the perpetual check or face the option of losing his two pawns out of the wonderful trio) 36...f3 (36...g5!?) 37.Rgf7. As black pawns do not support each other they turn into targets rather than into queens. The engine suggests 37…c3+! 38.bxc3 (38.Kxc3 Kg8 39.Rg7+ Kh8 40.Rcf7 Rc8+! – this is the point of 37…c3+) 38...Rxf7 39.Rxf7 Rxa4 40.Rxf3 Kg7 41.Kd3, and Black is supposed to draw the game although he keeps being down a pawn.
No less interesting is 33.Kc3!? f4 34.a4 (after 34.Rxc4 Rg3+ 35.Kd2 g5 36.b4 Rg2+ 37.Kd3 Rg3+ 38.Ke2 Re8+ 39.Kd2 Kf7 Black is OK) 34...g5 35.a5 Ra8 36.Kb4 Rg3
37.Rb7!? Well, this is not my idea, of course. The idea behind this move is to proceed with Kb5 to be followed by a6-a7…
37...Rg2 (37...f3? 38.Kb5) 38.Ka4 c3 39.b4 Rxc2 40.Kb3 Rg2 41.Kxc3 Rg3+ 42.Kc4 f3. Well, what is the difference between this line and the line with 37…f3? The difference is that after 43.Kb5 Rf8! 44.a6 f2 45.a7 Ra3 the exchange of the c-pawns allows Black to put his rook behind the pawn, attaining a draw.
In general it should be said that the arising rook ending features much depth below the above-given lines and thus deserves being analyzed in a dedicated article.
33...c3+ 34.Kxc3 Rxa4 35.b4 Rb8 36.Rd1
Initiating fight at this stage of the game is only too late: 36.Rb1 f4 37.b5 f3 38.Kd3 f2 39.Ke2 Rf8 40.b6 Re4+ 41.Kf1 Rg4 42.Ke2=.
36...Raxb4 37.Rdd7 Rg4 38.Rg7+ Kh8 39.Rh7+ Kg8 40.Rhg7+ Kh8 41.Rh7+. Draw.
Grischuk – Giri
1.d4 Nf6 2.c4 e6 3.Nf3 d5 4.Nc3 c6 5.e3 Nbd7 6.Be2 Bd6 7.0–0 0–0 8.a4
This plan is not as commonplace as 8.b3 or 8.Qc2.
8...Qe7 9.a5 a6 10.Qb3 Ne4 11.Nd2 f5 12.f4 Rb8
This position has been tested before. Jovanic-Pavasovic, Rijeka 2006, saw 12...Nxd2 13.Bxd2 Nf6 14.Be1 dxc4 15.Bxc4 Nd5, and in the subsequent game Black obtained reasonable play although the situation looks more favorable for White.
13.Ndxe4 dxe4 14.Bd2 g5

As it turned out later Giri was overly optimistic about Black’s prospects. In fact, the closed nature of the position does not allow Black to create sufficient threats on the kingside as his bishops lack scope in perspective.
15.g3
Ignoring Black’s idea also deserved attention while planning to recapture on f4 with another pawn: 15.Na4 gxf4 16.exf4.
15...h6 16.Na4 Kh7 17.Nb6 Nf6
There was nothing wrong with trading of knights in order to dull the position out to a certain extent: 17...Nxb6 18.Qxb6 (18.axb6 gxf4 19.gxf4 c5 looks weaker to me) 18...c5 19.d5 gxf4 20.exf4, but even here White’s game gives the impression of being more clear-cut.
18.Kh1 Bd7 19.Bc3 Be8 20.d5 gxf4
Black is after the wrong plan, overestimating his prospects on the kingside. 20...cxd5 was a sensible move. Simple 21.cxd5 Nxd5 22.Nxd5 exd5 23.Qxd5 Bc6 would lead to an equal game. Perhaps, it was White’s idea to come up with a rather subtle 21.Rad1!? to be followed by something like 21...gxf4 22.gxf4 dxc4 23.Nxc4 Bc5 24.Be5 Rc8 25.Nb6 Rc6 26.Rg1 when White has definite compensation for his missing pawn, but not more than that.
21.gxf4 Ng4?!
Now Black is going to find himself in a worse position. 21...exd5 22.cxd5 Rd8 would have met the requirements of the position, resulting in an approximate equality.
22.Bxg4 fxg4

Black lacks a couple of tempi to create his play on the kingside.
23.Qc2
A sharp continuation 23.c5! Bxc5 24.dxe6 was stronger, but is there any telling whether after 24…Bxe3 25.f5 g3 White is not going to end up being mated? It appears that everything is OK after: 26.f6 Qd6 27.Be1! Blockading the f-pawn does not prove a sound idea for Black as the e4-pawn becomes vulnerable: 24…Rf5 25.Rad1 Rd8 (simply bad is 25...Rh5 26.Rf2 Bxe3 27.Rg2+–) 26.Rxd8 Qxd8 27.Qc2 Qh4 28.Qg2±. White opts for a quiet move that retains all the advantages of his position.
23...Bg6 24.Rad1 Rbd8 25.b4 c5 26.bxc5 Bxc5 27.Qe2 Bf5 28.Be5 Rg8 29.Rg1 Qf7 30.dxe6 Bxe6 31.Nd5 Be7 32.Qc2
White is also better after the sound continuation 32.Nxe7 Qxe7 33.Rd4. After the move in the game White is obviously better, and his king is pretty safe, for example: 32.Qc2 Bf5 (32...Bh4 33.Rg2) 33.Rg2. However, it is difficult to propose any improvement plan for White except the exchanges of the minor pieces on e7 with the opposite-colored bishop ending to follow, where missing opponent’s threats against your king is not such an unlikely event to happen.
A draw was agreed.
Jobava has scored a full point in an excellent style and made everyone happy save for Dominguez, who had his aspirations towards sharing the first place. Well, when Baadur does not have to fight for equality right from the opening, his play seems more natural.
Jobava – Dominguez
1.e4 e5 2.Nf3 Nc6 3.Bc4 Bc5 4.c3 Nf6 5.d4 exd4 6.e5 d5 7.Bb5 Ne4 8.cxd4 Bb6 9.h3 0–0 10.0–0 f6 11.Bxc6 bxc6 12.Be3 fxe5 13.Nxe5 Bb7
This line was seen in the game between Jobava and Grischuk played in round four. The drawish outcome after 13...Ba6 14.Re1 Ba5 15.Nxc6 Qh4 is not all that forcing. Quite possible is 16.Re2 Bxe2 17.Qxe2 Bb6 18.Nd2, as was mentioned by Baadur and not disagreed with by the engine. Should White succeed in keeping his grasp over the e5-square to be used as an outpost for his knight without allowing the с5 breakthrough at the same time, he is not going to find himself in any sort of danger. Let us avoid for a time being from passing a final sentence over this still immature line, suffice it to say that 14…Qh4 15.Nf3 Rxf3 16.Qxf3 Rf8 17.Qg4 Qf6 has never been tested in practice. The resulting position features sound compensation for Black, according to “Houdini”.
14.Nd2
14.Qc2!? deserved attention because after 14...c5 15.dxc5 d4 16.Qc4+ Bd5 17.Qxd4 Bxc5 18.Qd3 Bxe3 (18...Qd6 19.Nc3) 19.Qxe3 Qd6 20.Nc3! Black cannot escape with a draw immediately, whereas in response to 14…Qe7 White can check both 15.Nd2 Nxd2 (or 15...c5 16.Nxe4 dxe4 17.Qc4+ Kh8 18.dxc5 with slightly better chances) 16.Qxd2 c5 17.dxc5 Qxe5 18.b4 as well as 15.Nc3 Nd6 16.Na4 Nf5 17.Nxc6 Bxc6 18.Qxc6 Nxe3 19.Nxb6 Nxg2 20.Nxd5 Qg5 21.Nf6+! However, the rook ending is very likely to be drawish.
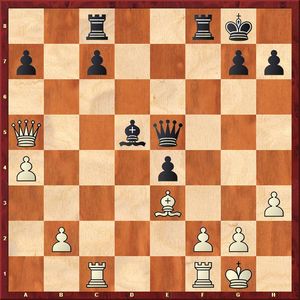
14...c5 15.Nxe4 cxd4 16.Bxd4 dxe4 17.Qb3+

This is a critical position. The correct idea now was 17...Qd5 18.Qxd5+ Bxd5 and Black seems to have no special problems in the arising endgame: 19.Rfd1 Rad8 when the exchange on b6, which is going to inevitably take place sooner or later, will improve the damaged black pawn structure on the queenside: 20.Bxb6 axb6 21.Ng4 Be6 22.Ne3 c5. The white knight, of course, is an excellent blockading piece against the black isolated pawn, but black bishop together with definite space advantage affords Black sufficient compensation. Black must have overestimated his opportunities.
17…Bd5 18.Qc3 Qg5 19.Be3 Qh5
It was a good idea to start seeking ways to equalize. This could have been achieved via two paths: either 19...Bxe3 20.fxe3 Rfe8 21.Nc4 (21.Nd7 Be6 threatening to capture the h3-pawn) 21...Be6 22.Kh2 Rad8 23.Rad1 Qc5 or 19...Qf6 (as if “pinning” the knight against the queen) 20.Rac1 (20.Rfd1 is simply met by 20…Be6, restricting the scope of the e5-knight; Black is also completely fine after 20.Rfc1 Bxe3 21.fxe3 Rae8 22.Nd7 Qf2+ 23.Kh1 Rf3!?) 20...Bxa2! - you have to play like this from time to time. It is not difficult to see that the black bishop manages to be extricated out of his precarious position: 21.b3 Rfe8 22.Nc4 Qxc3 23.Rxc3 Bxe3 24.fxe3 Rab8 25.Nd2 Red8 with a draw. If we go back to the comments to the seventeenth move of Black, it becomes clear that the exchange of queens is in Black’s favor.
20. Rad1 Be6 21.Rde1 Bd5 22.a4 Ba5?
This is a blunder. A subtle 22...Qe8!? was proposed by the engine in order to happily take on a5 in case of 23.a5. The whole idea behind the engine move is simply to ward off the b2-b4 idea! Now that Black has already committed a couple of inaccurate moves it is difficult to come up with some better idea.
23.Qxa5 Qxe5 24.Rc1 Rac8
24...Rfc8 fails to 25. Rc6!, although after 25.Bf4 Black is also in bad shape.
This is a remarkable moment, to my mind. White could have simply taken the a7-pawn: 25.Qxa7 c6 26.Qd4 Qxd4 27.Bxd4 Ra8 28.Ra1 Rfb8 29.a5 with superb winning chances, to say the least. However, White made a different move.
25.Rfd1 c6 26.b4!!
This is a brilliant positional approach. White is making use of the vulnerability of the bishop’s position on d5 (let us note also that in the above-mentioned endgame after capturing the pawn on a7 it was the bishop that was performing a cementing action) and pulls the carpet away from under his. At the same time White keeps the a7-pawn under control, although it takes him another six moves to capture it with a decisive effect. Instead of having to convert his advantage over the course of a lengthy endgame, White is now winning the game in just a couple of moves.
26...Qe6
26...a6 does not bring any relief in view of 27.Rc5! (rather than 27.Qxa6 Ra8 28.Qf1 Rxa4 29.b5 Bb3), and White wins a pawn in a yet better version of the position: 27...Qe6 (27...Qh5 28.Rdc1 Qe8 29.Qxa6 Ra8 30.Qe2 Rxa4 31.b5) 28.Qxa6 Ra8 29.Qb6. In all lines White manages to profit from the shaky position of Black’s bishop on d5.
27.b5 Bb3
In response to 27...Ra8 White simply keeps pressurizing via 28. Rc3!, and Black is defenseless. 27...Bc4 fails immediately to 28.Bc5 Rfe8 29.Rd6 Qf7 30.bxc6.
28.Rd2 cxb5 29.Rxc8 Qxc8 30.axb5 Bc4 31.Rc2 Qe6 32.Qxa7 Qd5
The pawn, of course, cannot be taken in view of: 32...Bxb5 33.Rc7 Rf7 34.Qb8+ Be8 35.Rc8.
33.Bd4 Rf7 34.Qb8+ Rf8 35.Qc7 Qxd4 36.Qxc4+ Qxc4 37.Rxc4 Rb8 38.Rb4 Kf7 39.Kf1 Ke6 40.Rxe4+ Kd6 41.Rd4+ Ke6 42.Rb4 Kd5 43.Rh4 h6 44.Rg4 g5 45.Rb4 Kc5 46.Rb1 Kb6 47.Re1 Kc5 48.Re6 Black resigns.
Vachier-Lagrave – Svidler
1.e4 e5 2.Nf3 Nc6 3.Bb5 a6 4.Ba4 Nf6 5.0–0 Be7 6.Re1 b5 7.Bb3 d6 8.c3 0–0 9.h3 Re8 10.d4 Bb7 11.a3 h6 12.Nbd2 Bf8 13.d5 Nb8 14.Nh2 Nbd7 15.Qf3 c6
Later Peter admitted that when preparing for the game he somehow dropped sight of his opponent’s game with Krylov. Therefore, let me cite it here: 15...g6 16.Ndf1 Bg7 17.Ng4 Kh7 18.Bc2 c6 19.dxc6 Bxc6 20.Nfe3 h5 21.Nxf6+ Qxf6 22.Rd1 Qxf3 23.gxf3 Bf8 24.Bb3 Kg7 25.Bd5 Rec8 26.a4 Nb6?! 27.Bxc6 Rxc6 28.axb5 axb5 29.Rxa8 Nxa8 30.Nd5 Nb6 31.Be3, Vachier-Lagrave – Krylov, Moscow 2010. In general, the endgame is not pleasant for Black. In this particular position, however, Black could have equalized via 31...Nxd5 32.Rxd5 b4 33.cxb4 Rc2=.
A lot of previous games, including those played the by Peter’s many-time second, saw: 15...Nc5 16.Ba2 c6 17.dxc6 Bxc6 18.Ng4 Ra7, as in Kurnosov-Matlakov, Khanty-Mansiysk 2012.
16.dxc6 Bxc6 17.Ng4 Qe7 18.Nf1
A very similar ending appeared in Quesada Perez-Ibragimov, Toluca 2011 after 18.Ba2 Nxg4 19.hxg4 Qf6 20.Nf1 Qxf3 21.gxf3 Red8 22.Ne3 Nb6 23.Rd1 Rac8 24.Nd5 Nxd5 25.Bxd5 Bxd5 26.Rxd5.
18...Nxg4 19.hxg4 Qf6 20.Ne3 Qxf3 21.gxf3 Nb6 22.Rd1 Rac8 23.Nd5 Nxd5 24.Bxd5 Bxd5 25.Rxd5 Rc4

This is a critical position for the evaluation of the entire endgame. One cannot help exclaiming that, if there is nothing for White to "press for" in this very position, then it must be drawish everywhere else! And this is exactly how it is. Is it still possible to pose any problems in some way? White was focused on the f3-f4 break, and Black managed to stay afloat. I would like to bring to life yet another resource: a3-a4. In order to achieve this you need to carry out b2-b4, and thus you come to the conclusion that you need to have you pawn protected: 26.Bd2!? However, it is met by 26... Rc5 27.Rd3 d5, and although White keeps retaining the upper hand, the possession of the d-file alone is not enough for any serious advantage.
26.Be3
Black chooses to follow the standard plan, transferring his king to e6 in order to render the white piece on d5 more vulnerable. It should be noted, however, that the first move of the plan is not that conventional, taking into account that his bishop is a dark-squared one.
26...f6! 27.Kf1 Kf7 28.Ke2 Ke6 29.Kd3
Let’s check the attempt to launch the queenside play: 29.Kd2!? g6 30.b3 Rc7 31.a4 Rec8 (31...Rb8) 32.axb5 axb5 33.f4!? (after 33.Rc1 Rb7 34.f4 f5! White goes on retaining no more than just a token advantage, although the game still continues after 35.gxf5 gxf5 36.f3) 33...exf4 34.Bd4 Rb8. Having sacrificed a pawn, White has managed to assign his pieces to optimum locations, but what next? 29.Rd3 might have been another option worth giving a try.
29...g6 30.Rh1
In the case of 30.b4 (intending a4) 30…Rec8 31.Bd2 f5 the rook on d5 is being threatened.
The rook on c4 is making you nervous, of course. What if you just drive it away by 30.b3 Rc6? Now White is up against a choice:
a) The f3-f4 plan would still be met by f6-f5 with subsequent simplifications to follow: 31.f4 f5 32.gxf5+ gxf5 33.fxe5 dxe5 34.f3 Rec8 35.Bd2 Be7;
b) A rather lively game results from 31.b4 f5 32.a4 f4 33.axb5 (White will never improve his position further after 33.Bd2 Rb8 34.axb5 axb5 35.Ra5 Rcb6. The damaged white pawn structure on the kingside has started to tell, at last!) 33...axb5 34.Ba7 Rec8 35.Ra3 h5 36.gxh5 gxh5 37.Rxb5 h4. Oddly enough, Black’s passed pawn has its field day also: 38.Rb7 Be7 39.b5 Rc4 40.b6 h3 41.Rxe7+ (or 41.Rb8 h2 42.Rxc8 h1Q 43.Kxc4 Qf1+ 44.Kb3 Qd1+=) 41...Kxe7 42.b7 h2 43.bxc8Q Rxc8 44.Ra1 Ra8=;
с) White is slightly better after 31.a4 Rec8 32.Bd2 Rc5 33.axb5 axb5 34.Rxc5 dxc5 35.Ra6+ Kf7 36.f4 exf4 37.Bxf4, although the winning chances are very few, if any.
30...Re7 31.f4
It appears that White has resigned himself to recognizing the futility of further fighting for the advantage. The inclusion of preliminary moves 31.b3 Rc8 32.f4 promised nothing special. The sacrifice of Black’s rook on e4 is no longer a threat, but after 32…f5 33.gxf5+ gxf5 34.fxe5 dxe5 35.f3 Rec7 36.Bd2 f4 White’s advantage is kept to minimum.
31...Rxe4 32.Rxd6+ Kxd6 33.Kxe4 exf4+ Draw.
Finally, Gelfand-Tomashevsky saw no real fight due to a superb opening preparation demonstrated by the second player.