


14 June 2015
Only Jobava Goes All-In
Round Eleven Review of the Final FIDE Grand Prix in Khanty-Mansiysk by GM Vasily Yemelin.
The nature of the final round of the FIDE Grand Prix was about the tournament leaders doing their best to seal the top places. Although Jakovenko had a speculative chance of improving his overall standing, it was only perceived as such. The game can be characterized as having been developing favourably for Black, but not more than that.
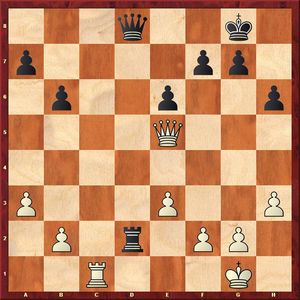
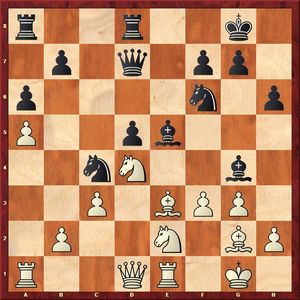
Nakamura – Jakovenko
1. d4 Nf6 2.c4 e6 3.Nc3 Bb4 4.Qc2 d6 5.a3 Bxc3+ 6.Qxc3 0-0 7.Bg5 Nbd7 8.e3 b6 9.Ne2 Ba6 10.Rd1?!
Fighting for victory in the Nimzo-Indian with 4.Qc2 is extremely challenging, especially if White is happy about the draw. However, plunging into complications in some other lines would be a manifest of imprudence since finishing third would leave Jakovenko with more chances to land in the Candidates Tournament than going for broke with black pieces against Nakamura.
The last White’s move is an obvious inaccuracy, after which Black is nowhere near even the slightest of problems.
10…h6 11.Bxf6
Due to White’s 10th move it has become possible to counter 11.Bh4 with the classic exchange of pieces via 11…Ne4.
11...Nxf6 12.Ng3 c5 13.Be2 Qc7 14.0–0 Rac8 15.Rc1
The last Black’s move had the provocative nature since White had at his disposal 15.d5 with the idea of meeting 15…exd5 with 16.Nf5. Black has to be precise in order not to find himself in a precarious situation. However, the factor of safety is quite substantial: 16…Rce8 17.Rxd5 (Black is OK after 17.Nxh6+ Kh8 18.Ng4 Nxg4 19.Bxg4 dxc4 20.Rd5 Re5 21.Rfd1 Rxd5 22.Rxd5 Qe7) 17...Re5 18.Rxe5 dxe5 19.Rd1 Bc8 and the position becomes equal.
15...cxd4
15...Rfd8 was along the lines of the previous move, although Black has nothing to squeeze out of the position even after the trivial 16.dxc5.
16.Qxd4
In the case of 16.exd4 Black could relish some prospects connected with the plan of 16…Qe7 followed by doubling of rooks Rc7, Rfc8 and d6-d5, if need be.
16...Rfd8 17.Qd2 Qb8 18.Rfd1 d5 19.cxd5 Rxd5 20.Qe1 Rxc1 21.Rxc1 Bxe2 22.Qxe2 Qd8 23.h3 Rd3
White’s defensive idea was to answer 23...Rd2 with 24.Rc8=.
24.Nh5 Nxh5 25.Qxh5 Rd2 26.Qe5
Black has squeezed as much as he could out of the position, but in view of the strong centralized position of the white queen his edge is of a rather symbolical nature. Nothing can be gained by 26...Qh4 27.Rf1 and the temporary passive position of the white rook is compensated by the precarious situation in which the black pawns a7 and b6 are in. Jakovenko tries out his last chance by transiting into the queen ending and changing the pawn structure. However, Nakamura defends with great confidence.
26…Rxf2 27.Kxf2 Qd2+ 28.Kf3 Qxc1 29.Qb8+ Kh7 30.Qxa7 Qf1+ 31.Kg3 Qe1+ 32.Kh2! Qxe3 33.Qxf7 b5 34.Qd7 Qf4+ 35.Kg1 Qc1+ 36.Kh2 Qf4+ 37.Kg1 Qc4 38.Qd1 Draw.
Caruana has attained his sporting goals in a highly confident manner.
Giri – Caruana
1. c4 c5 2.Nf3 Nf6 3.Nc3 Nc6 4.e3 e6 5.d4 d5 6.a3 a6 7.dxc5 Bxc5 8.b4 Ba7 9.Bb2 0–0 10.Qc2 Qe7 11.Rd1 Rd8 12.Be2 dxc4
Black has often experienced problems equalizing after 12...d4: 13.exd4 Nxd4 14.Nxd4 Bxd4 15.0–0 e5 16.Na4 Be6 17.c5 Qc7 18.Nb6 Rab8 19.Bxd4 Rxd4 20.Rxd4 exd4 21.Rd1 with better prospects for White, as in Aronian-Anand, Monaco 2011.
Taking on c4 is the strongest approach, when the arising symmetrical pawn structure goes along with Black’s plans for this game.
13.Rxd8+ Nxd8 14.Ne4 Nxe4 15.Qxe4 c3 16.Bxc3 Bd7 17.0–0 Rc8 18.Bb2
Up to this moment the game has followed the tracks of the predecessor game Wang Hao-Gelfand, Beijing 2013, which saw 18.Rc1 Ba4 19.h4 Bb8 20.Qb1. At this moment Gelfand opted for a rather responsible decision, which was not dictated by any immediate necessity: 20…f5!? 21.g3 Nf7 22.Ba1 Rxc1+ 23.Qxc1 Bc6 24.Qc3 Nd6. White has ways to maintain a certain amount of pressure as, for example, after 25.Ng5!? or 25.Ne5 Be4 26.Nd3 (or 26.Bd1!?), and the course of the game saw Giri suffering a little bit. Giri seems to act less precisely than Wang Hao.
18...Bc6 19.Qb1 Ba4 20.Bd3 h6 21.Qa1
The piece play: 21.Ne5 Nc6 22.Rc1 Rd8 23.Bh7+ Kh8 24.Be4 Nxe5 25.Bxe5 f6 would not yield any special benefits. The exchange of knights has dulled the position out to a certain extent and the scope of the dark-squared bishops of both opponents is restricted.
21...Qf8
22.g4?!
White will not be able to create any real threats. Of course, Giri takes courage from the fact that Caruana is in need of a draw. A simple 22.Be4 makes more sense, maintaining a minimum amount of pressure. It is important that White can profit from the pin along the c-file in case Black makes up his mind to drop his bishop back to c6.
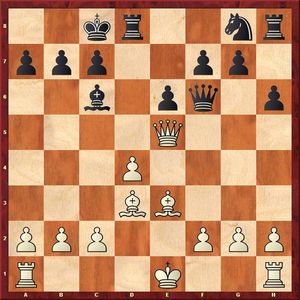
22...Bb8 23.g5?!
It was not yet too late to make the previous move look like an enlarged luft for the king by playing an accurate 23.Rc1. Pushing on with this plan, however, is quire risky and is likely to end up badly.
23...hxg5 24.Nxg5 f6 25.Ne4 Nf7 26.Qb1 Qe7 27.Rc1 Bc6
It has become quite obvious that White’s endeavor has resulted in nothing else but the formation of weaknesses. Caruana decides to avoid the exchange of rooks in favor of exchanging bishops. Black is also better after 27 ... Rxc1 + 28.Qxc1 Bc6, maybe even better than in the game itself.
28.b5 axb5 29.Bxb5 f5 30.Ng3 Ng5 31.Bxc6 bxc6 32.Rd1 c5 33.Ba1
Incorrect here would have been to go for 33...c4 34.Qb4! (34.Bc3 is even more strongly than in the game met by 34…Be5, whereas after 34.Qb5 Bxg3 35.Rd7 Bxh2+ 36.Kg2 Qc5 White would also be forced to keep struggling for equality) 34...Qf7 and only now 35.Qb5, creating the threat of the white rook penetrating into the seventh rank, which is clearly nothing that Black would like to see happening. However, after 33...f4 34.exf4 Nh3+ 35.Kf1 Nxf4 36.Qe4 Rf8 Black has an edge as White’s weaknesses are more substantial than Black’s and his king’s position is weaker than that of his black counterpart.
However, looking at this position from the safety point of view, Black needs to exercise extra vigilance against his g7-pawn becoming the subject to potential attacks in all lines. Therefore, Caruana makes up his mind to get rid of this nuisance once and for all.
33…Be5 34.Bxe5 Nf3+ 35.Kg2 Nxe5 36.Qb5 Qc7 37.Qa6 Qc6+
A draw was agreed here. It should be noted, however, that in the final position White has not equalized completely yet, although the amount of material remaining on the board has been reduced significantly.
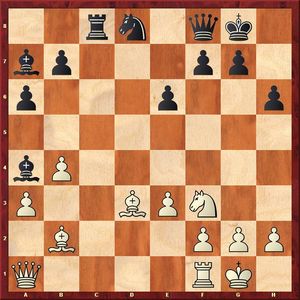
Karjakin – Gelfand
1. e4 c5 2.Nf3 d6 3.d4 cxd4 4.Nxd4 Nf6 5.Nc3 a6 6.Bg5 Nbd7 7.a4
This is a peculiar line. The combination of moves Bg5 and a4 creates the impression of being inconsistent, although quite relevant is that White succeeds in pushing his pawn as far as a5. Black would very much like to meet this advance by the immediate development of his knight to с6, however...
7...e6 8.a5 Be7 9.Be2 0–0 10.0–0 Qc7 11.Qd3
This is a well-known queen transfer to g3 via d3, which can be encountered in the classic Scheveningen variation, was seen in this particular position in the blitz game between Morozevich and Grischuk in the Tal Memorial only with the white pawn still on a4. The previous games have featured the prophylactic knight maneuver: 11.Nb3 h6 (such maneuvering of black pieces that ignore the queenside blockading as: 11...Ne5 12.Be3 Bd7 13.Bb6 Qc8 14.Nd2 Bc6 15.Bd4 Qc7 16.Be3 Rac8 17.f4 Ng6 18.Bd3 as in Naroditsky – Gao Rui, Reykjavik 2015, seem suspicious, although in this particular position the continuation 18...e5!? 19.f5 Nf4 afforded him reasonable play) 12.Be3 Nc5 13.Nxc5 dxc5 14.f4 Rd8 15.Qe1 Bd7 16.Qg3 Bc6 17.Bf3 Kh8 18.e5 Nd5 19.Nxd5 Bxd5 20.f5 exf5 21.Bxd5 Rxd5 22.Rxf5 Rf8 Vallejo Pons-Le Quang Liem, Tromso 2013, and Black is very close to equality.
Grabarczyk in his game against Kempinski attempted a useful substitute move, without committing his knight to b3 yet, but after 11.Re1 b5! 12.axb6 Nxb6 13.Nb3 Rd8 14.Qd4 e5 15.Qd3 Be6 Black managed to obtain excellent play, whereas the substitute move proved useless, as in Grabarczyk-Kempinski, Lubniewice 2005.
11...h6 12.Bd2 Nc5 13.Qe3 d5!
Inaccurate is 13...e5 14.Nb3 Nxb3 15.cxb3 Be6 16.Rfc1 Qd7 17.Bc4 and White goes on retaining a slight edge. An interesting-looking opportunity 14...Be6 15.Nxc5 dxc5 16.Qg3 Kh8 17.Be3 Rfd8 with the idea Rd4 fails to work. I always wanted to repeat the famous Botvinnik’s idea, but it has never come to happen, even when commenting someone else’s game... 18.f4 gives White better chances whereas 18...Rd4 ?! is simply bad in view of 19.f5 Bc4 20.Bxd4 cxd4 21.Bxc4 Qxc4 22.Nd5 Nxd5 23. Qxe5! ±.
14.exd5 exd5 15.Bf3 Rd8 16.Rfe1
Black enjoys a rather comfortable version of an isolated pawn-type of position and he has at his disposal the following very concrete approach to this position: 16...Nce4!?, and 17.Nxd5 Rxd5 18.Bxe4 Ng4 19.Bh7+ Kh8 (equally interesting might be 19...Kxh7 20.Qe4+ Kg8 21.Qxd5 Qxh2+ 22.Kf1 with compensation) 20.Qxe7 Qxh2+ 21.Kf1 Rxd4 22.Bc3 Qf4 23.f3 Nh2+ 24.Kf2 Kxh7 25.Bxd4 Ng4+ ends up in a forced draw. Gelfand avoids these computerish complications in favor of a sound positional move.
16…Bd6 17.g3 Ne6 18.Qd3
White gains nothing after 18.Na4 Nxd4 19.Qxd4 Qxc2 20.Bxh6 Qf5 21.Bf4 Bxf4 22.Qxf4 Qxf4 23.gxf4 Bf5 and with so many weaknesses White cannot count on getting any sort of advantage in the endgame.
18...Nc5 19.Qe2 Bh3 20.Be3 Be5 21.Qd1 Nce4 22.Nce2 Bg4 23.c3
This consolidating move stands to reason. White is not yet ready for 23.Nf4 in view of 23…Bxf3 24.Qxf3 Ng5 25.Qg2 Ng4 with an excellent game for Black in view of 26.Nxd5? Rxd5 27.Qxd5 Rd8.
23...Qd7 24.Bg2 Nd6 25.f3 Nc4
In order to establish the reason why Black has so far failed to attain completely comfortable game we might need to go as far back as some dozen moves. After 25...Bh3 26.Bxh3 Qxh3 27.Nf4 Qd7 28.Nd3 Re8 29.b3 there is an unmistakable feeling that White keeps exerting a definite amount of pressure on his opponent. Nevertheless, this is how Black should have continued. The move that Black played might have landed him in a worse position than that.
26.Bc1
White must have been looking forward to the approaching wrap-up of the tournament. Meanwhile, the logical continuation 26.Bf4! Bxf4 27.Nxf4 Bf5 28.b3 Nd6 29.g4 Bh7 30.h4 would have left him with better chances in a risk-free position.
26...Bh3 27.Bxh3 Qxh3 28.b3 Nd6 29.Nf4 Bxd4+ 30.Qxd4 Qc8 31.Qd3
The engine would attempt to squeeze something out of this position via 31.Bb2!? Nb5 32.Qb4, obviously pinning his hopes on capitalizing on an undefended knight’s position on f6 in some lines after c3-c4. However, there is no escaping a suspicion that such lineup of the bishop can prove successful in one game can cost five upsets in another five... After 32…Qf5 followed by Nh5 Black is completely OK.
31...Nb5 32.Ne2 Nd7 33.Nd4 Draw.
Svidler – Jobava
1. e4 e6 2.d4 d5 3.Nc3 dxe4 4.Nxe4 Bd7 5.Nf3 Bc6 6.Bd3 Nd7 7.Qe2
The game has so far developed to one of the trademark lines of Jobava. After 7.0–0 Ngf6 8.Ng3 the setup with 8…g6!? brought him a victory in his game against Kasimdzhanov in the FIDE Grand Prix series in Tashkent. After 9.c4 Bg7 10.d5 exd5 11.Re1+ Kf8 12.cxd5 Bxd5 13.Qc2 c6 14.Ng5 Kg8 15.Bf4 Nf8 White failed to prove the sufficiency of his compensation for the missing pawn, Kasimdzhanov-Jobava, Tashkent 2014.
7...Be7
Quite risky is 7...Ngf6 in view of 8.Neg5 h6 (quite possible but rather passive is 8...Qe7) 9.Nxe6 fxe6 10.Bg6+ Ke7 11.0–0. Despite being a piece down, the evaluation of this position by the engine as being positive for White makes it a good reason to start with preventive 7...Be7.
8.Neg5
During the post-game press conference Svidler characterized this move as a bluff.
8...Bxg5
Jobava reacts quite logically and equalizes rather easily. But even stronger was a bold move 8...h6 9.Nxe6 (9.Nxf7 Kxf7 10.Bg6+ Kxg6 11.Qxe6+ Ngf6 12.Nh4+ Kh7 is not even good enough for White to escape with a perpetual check) 9...fxe6 10.0–0 (or 10.Qxe6 Nf8 with the possible idea of Qd5-h5 in some lines). Now strong is 10...Bd6! 11.Qxe6+ Qe7. It is quite important that 12.Qg6+ Qf7 13.Qxf7+ Kxf7 14.Bc4+ Kf8 15.d5 does not work in view of 15…Nb6 with an edge for Black. Black also stands better after 12.Qh3 Bxf3 13.Bg6+ Kd8 14.Qxf3 Qh4 15.g3 Qxd4.
9. Nxg5 h6 10.Nf3 Qf6 11.Ne5 Nxe5 12.Qxe5
Black is also OK after 12.dxe5 Qh4 13.Bd2 Ne7 14.0–0–0 0–0–0 15.f3 Ng6; it appears that White is unlikely to avoid the exchanges on g6.
12...0–0–0 13.Be3
13...Qe7?!
If Baadur is ever going to publish a book explaining the frame of mind behind his decision making it will undoubtedly become a best seller. After the evident 13...Qxe5 14.dxe5 Ne7= to be followed by Ng6 or Nf5 White is not in time to rearrange his bishops to consolidate the position.
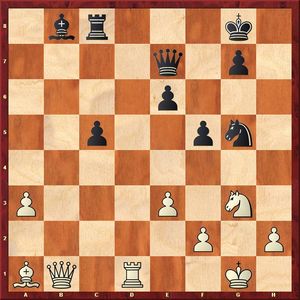
14.0–0–0 Nf6 15.f3 g5 16.c4 b6 17.Bd2 Nh5?! 18.d5 f6 19.Qe2
Black’s position has deteriorated drastically in just five moves. Also strong here was 19.Qe4 Bb7 (19...Ba4 20.Rde1) 20.Qg6 Nf4 (after 20...Ng7 21.dxe6 Nxe6 22.Rhe1 Kb8 23.Bc3 when the activity of White’s bishops in the open position guarantees him some sizeable advantage) 21.Bxf4 gxf4 22.dxe6 Rhg8 23.Qf7 Rg7 24.Qxe7 Rxe7 25.Bf5±, and White is up a pawn with good winning chances.
19...Ba4 20.b3 Bd7 21.g4 Ng7
After 21...Nf4 22.Bxf4 gxf4 23.dxe6 Qxe6 24.Qxe6 Bxe6 25.Rhe1 Bd7 26.Re4 h5 27.h3 hxg4 28.hxg4 f5 29.Rxf4 fxg4 30.fxg4 White emerges with an extra pawn. Black cannot profit from the double attack on the g4-pawn and the d3-bishop simply because 31…Rhg8 runs into 31. c5!±.
22.Kb1
22.h4!? also looked attractive in order to prevent the next Black’s move.
22...h5 23.h3
The engine has also approved of the previous calm move of White, but only because of its subsequent connection with the effective 23.h4! gxh4 24.g5 fxg5 25.Qe5 Qf7 26.Bxg5 Rdf8 27.Rxh4±, and the domination of white pieces starts to look menacing. Calm "human" moves allow Black time to improve his position somewhat, but it still remains difficult.
23...Qf7 24.Bc3 Kb8 25.Be4 Bc8 26.Rhe1 hxg4
There was no need rushing with the exchanges. The immediate 26...Bb7!? would have left Black with more options, the idea being that after 27.dxe6 Bxe4+ 28.Qxe4 Rxd1+ 29.Rxd1 Nxe6 30.Qf5 Re8!? or 30...h4 Black obtains counterplay. Also not so clear is 27.Qb2 Ne8 28.dxe6 (after 28.gxh5 Qxh5 29.Bxf6 Nxf6 30.Qxf6 exd5 31.cxd5 Rhf8 there is no guaranteeing that being up a pawn White is going to end up being victorious) 28...Rxd1+ 29.Rxd1 Bxe4+ 30.fxe4 Qxe6 31.e5 (after 31.Rd8+ Kb7 32.e5 hxg4 33.Qg2+ c6 34.Qxg4 Qxg4 35.hxg4 Kc7 Black succeeds in squeezing the rook out) 31...hxg4 32.Qg2 Qc8 33.hxg4 fxe5 34.Bxe5 Rh7. Although this simplified position is still favorable for White, Black is not entirely without defensive resources.
27.hxg4 Bb7 28.dxe6 Bxe4+ 29.Qxe4 Rxd1+ 30.Rxd1 Nxe6 31.Qf5 Rh6
White can also win a pawn after 31...Rf8 32.Re1 Nf4 33.Bxf6!? (it might well be that maintaining pressure via 33.Kb2!? made more sense) 33...a5 34.Bxg5 Qxf5+ 35.gxf5 Rxf5 36.Bxf4 Rxf4 37.Rf1. However, there is no definite telling that the arising rook ending is decisively favourable for White.
32.Rd2 Qg6 33.Qxg6 Rxg6 34.Rd5 Rh6 35.Rf5 Rh1+ 36.Kb2 Rh2+ 37.Kb1 Rh1+ 38.Kb2 Rh2+ 39.Ka3 a5 40.Rxf6
Taking the pawn in a different way is double-edged because after 40.Bxf6 Rf2 41.Re5 Nf4 (bad is 41...Nc5 in view of 42.Re8+ Kb7 43.Bd4 Rxf3 44.Bxc5 bxc5 45.Re5+ with a winning endgame for White) 42.Re3 Ne2 43.Bxg5 Nd4 when, for example, after 44.Re4 Nc2+ 45.Ka4 Nb4 46.a3 Kb7 White needs to think about converting his advantage and being on the alert not to get mated at the same time.
40...Re2 41.Rf5 Rf2 42.Re5 Nf4 43.Rxg5 Rxf3 44.Kb2
Regrettably for White, a seemingly easy solution 44.Bxa5 bxa5 45.Rf5 Kb7 46.g5 Rg3 47.Rxf4 Rxg5 48.Ka4 c6 leads to no more than a drawish ending.
44...Nd3+ 45.Kc2 Nb4+ 46.Bxb4 axb4
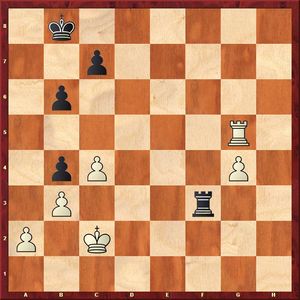
For lack of detailed analysis it is hard to say where the evaluation has crossed the borderline between the significant and decisive advantages, but this position seems to be already winning for White. Correct is 47.Rd5! Rg3 48.g5 c6. The aim of the 47th move is exactly to provoke this weakening. Now, the weakness of Black's pawns leaves him with much less defensive resources. 49.Rf5 Kc7 50.Kd2 Kd7 51.Ke2 Ke7 52.Kf2 Rg4 53.Kf3 Rg1 54.Kf4 and there is no defending this position.
Later both opponents committed mistakes that changed the evaluation of the position.
47.Rf5 Rg3 48.g5 Kc8 49.Kd2 Kd7 50.Ke2 Ke6 51.Rb5 Rg2+ 52.Kf3 Rxa2 53.Rxb4 Ra1?
Jobava didn’t fail to recognize the importance of having the white king cut off along the fourth rank, but he overlooked that the pawn ending arising after 53...Rd2! 54.Rb5 Rd4 55.Rd5!? would become immediately drawish after 55…Rxd5 56.cxd5+ Kf5! In fact, the cut-off idea is so strong that it helps Black even without having to transit into a pawn ending: 55...Rh4. The realization of this idea can be started with not so aesthetically looking 53...Rh2.
54.Rb5
Now Black cannot parry two threats c5 and Kg4–h5 at the same time.
54...Kf7 55.Ke4?
White fails to take into consideration the defensive resources of Black. Correct was the immediate 55.c5! bxc5 56.Rxc5 Rb1 (it is obvious that assigning the rook to the passive defensive is not going to save the day for Black: after 56...Ra7 57.b4 c6!? 58.Rxc6 Rb7 59.Rc4 Rb5 60.Rg4 Kg6 61.Ke3 one pawn will be given back as a free gift, whereas the second pawn is going to cost Black a rook) 57.Rxc7+ Kg6 58.Rb7 Kxg5 59.Ke4+–.
A simple 55.b4 was also likely to be good enough to win the game. Black has nothing else to do but wait, which essentially means that White has managed to win a tempo if compared to what might have happened in the game: 55…Rb1 56.Ke4 Re1+ 57.Kd5 Re6 58.Kd4 Re1 59.c5 Rd1+ 60.Ke4 Re1+ 61.Kf3 Re6 62.cxb6 cxb6 63.Rd5 Kg6 64.Kf4.
55...Rd1?
55...Re1+ 56.Kd5 (the position after 56.Kd3 Rd1+ 57.Ke2 Rb1 or 57.Kc2 Rg1 cannot be improved) 56...Re6 57.Kd4 c5+! 58.Kd5 Rg6 59.Ke5 Re6+ 60.Kf5 Rd6 61.b4 cxb4 62.Rxb4 Rc6 was the way for Black to save the day, while now it all finishes in a textbook manner when the g-pawn does the job of deflecting, allowing White to win the pawn on the queenside and to queen his own pawn.
56.b4 Re1+ 57.Kd5 Re6 58.Kd4 Re1 59.c5 Rd1+ 60.Ke4 Re1+ 61.Kd5 Re6 62.Kd4 Rg6 63.cxb6 cxb6 64.Re5 Rc6 65.Kd5 Rc1 66.Kd6 Black resigns.
Tomashevsky – Vachier-Lagrave
1. d4 Nf6 2.c4 g6 3.Nc3 d5 4.Bg5 Ne4 5.Bh4 Nxc3 6.bxc3 dxc4 7.e3 Be6 8.Be2 Bg7 9.Nh3!? 0–0 10.Nf4 Bf5 11.Bxc4
White used the rare ninth move to throw the game out of the well-trodden paths. In this setup after 11.0–0 Black in Moradiabadi-Dominguez, Khanty-Mansiysk 2011 opted for a conventional plan of developing his game along the c-file and after 11…c5 12.Bxc4 Nc6 13.Qe2 cxd4 14.cxd4 Rc8 15.Rac1 Qd6 16.Bg3 Qa3 17.Rcd1 Na5 18.Bd3 Bxd3 19.Rxd3 Qa4 succeeded in obtaining a good position. It should be noted, however, that the castling on move eleven was an obvious inaccuracy, which could have been exploited by Black via 11...h6 12.Bg3 e5.
11...Qd6
What is going to come of the standard plan after 11...c5 12.0–0 Nc6, as in the above game of Moradiabadi against Dominguez, will become clear from some later games.
12.0–0 Nc6 13.Bg3 e5 14.Nd3 Rad8
15.Bb5
Although White provokes weakening of the queenside in order to secure the outpost on c5 for his knight, Black on his part is planning his own counterplay, which includes taking on d3 among other things.
15.a4!? deserved attention to stop the Na5 ideas. Another promising path is connected with 15.e4 Bd7 (bad is 15...Bxe4 16.Nc5 and Black loses material: 16…Qxc5 17.dxc5 Rxd1 18.Raxd1 with an edge for White) 16.Bb3 Qe7 17.d5 Na5 18.c4 f5 19.f3 with a slight edge for White.
15...a6 16.Ba4
16.Bxc6 runs into an intermediate move 16…Bxd3.
16...b5 17.Bb3 Bxd3
Black rushed with this exchange. He would have had fewer problems had he chosen to sidestep the pin with 17...Qe7, the point being that 18.Nc5? is impossible due to 16…exd4 19.cxd4 Bxd4! 20.exd4? Nxd4, whereas in the case of 18.Re1 the time is ripe for 18...Bxd3 19.Qxd3 Na5 20.Qe4 Rfe8 with equality.
18. Qxd3 Na5 19.Qe4 Rfe8 20.dxe5 Qd3
Black had to part ways with his pawn because 20...Bxe5? would fail to the obvious rejoinder 21.Rad1. However, the margin of safety is such that White is very unlikely to profit from this.
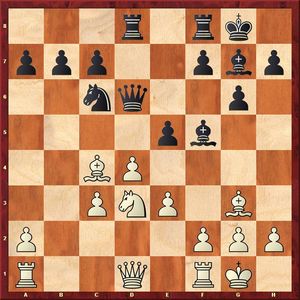
21.Qb4 Nxb3 22.axb3 Bxe5 23.Bxe5 Rxe5 24.Rxa6 c5 25.Qa5 b4?!
In the simple case of 25...Red5 26.g3 Kg7, intending to carry out c5-c4, Qe2 or Qc2 depending on what White is going to do in his turn, the activity of black pieces supplies him with sufficient compensates for the missing pawn. Even in the best-case scenario White can dream of nothing more than the rook ending with four against three pawns on the same flank. The most likely development of events is going to look something like 27.Rb6 Qc2 28.Qxb5 Rf5 29.g4 Qe4=. It appears that Black has overlooked something in his calculations as he is losing the second pawn.
26.Ra8! Ree8
Bad is 26...Rxa8 27.Qxa8+ Kg7 28.cxb4 cxb4 29.Qa1 Qc3 (29...f6 30.Qa7+ Kh6 31.Qb8 and the pawn is dropping as well) 30.Qxc3 bxc3 31.Rc1 Rc5 32.Rc2!
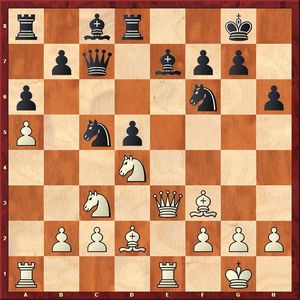
27.Rxd8 Rxd8 28.cxb4 cxb4 29.Qxb4 Qc2
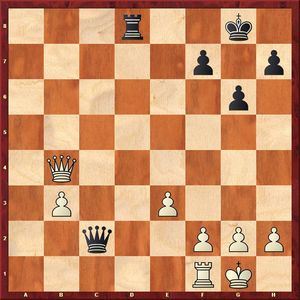
In some sense this diagram may serve as a symbol of the tournament that went wrong for Tomashevsky. He is up two healthy pawns, but still fails to bring this advantage home. Due to the active position of the black pieces White cannot convert his advantage neither by making his rook active nor by advancing his b-pawn provided, of course, that Black uses his defensive resources in a proper manner.
30.h4
White would rather move his other pawn to g4, but the immediate 30.g4 is not a good idea because this pawn starts hanging in some lines such as: 30…Rd3 31.Qb8+ Kg7 32.Qe5+ Kg8 33.b4 Rb3 34.Qf4 Qb2 35.Rd1 Rxb4.
More precise is 30.h3, but the bad news is that after 30…Qb2 31.Qb5 h5 32.b4 Kg7 there is no telling how White can go about improving his position. Although White can try his g2-g4 or even f2-f4-f5 ideas, it seems that Black has enough defensive resources at his disposal in all lines. Nevertheless, this pawn formation would have left White with some additional chances for success.
30...h5 31.g3
31.Ra1 is met by 31…Qb2. Now this rook move becomes a threat.
31...Qb2
It appears that also possible is 31...Rd3 32.Qb8+ (32.Ra1 Kg7 33.Qf4 Rd1+ would lead to a queen ending, as in the actual game) 32...Kg7 33.Qe5+ Kh7 (weaker is 33...Kg8 34.b4 Rb3 35.Qf4 Qb2 (losing is 35...Qf5 36.Qxf5 gxf5 37.Ra1 Rxb4 38.Ra5) 36.Rd1 Rxb4 37.Rd8+ Kg7 38.Qd6 Kh7 and it should be noted that despite the fact that White does not win the game immediately, the pawn has not been sacrificed in vain as it managed to reduce the black pieces to passivity. The winning plan is very likely to be found sooner or later) 34.b4 Rb3 35.Qf4 Qf5 36.Qc4 Rb2 37.Qc3 Re2. White cannot profit from the fact that he has succeeded in dislodging the black rook from b2 as he cannot get rid from the annoying pressure on f2. White is unable to improve his position any further.
In the subsequent play White parted ways with his b-pawn and went on torturing his opponent in the queen ending for a long time, without any success, however.
In the game between Dominguez and Grischuk White must have been taken by surprise by the choice of opening by his opponent and decided to make shift with a small victory in the field of creativity: in the well-known position, where everyone else has become used to exchanging queens and agreeing to a draw, the Cuban demonstrated the forced way to a draw by a perpetual check.